Top bar beehives are said to be one of the oldest types of residential beekeeping. Top bar hives can be found all over the world, made of various materials that are frequently repurposed or recycled. So, how to build a top bar beehive? Many people favor top bar beekeeping because it focuses on the natural state of the bees rather than the production of honey. The primary draw for many who try their hand at using a top bar beehive is learning about and fostering a practice that focuses on a more natural approach to beekeeping.
What is a modern top bar beehive?
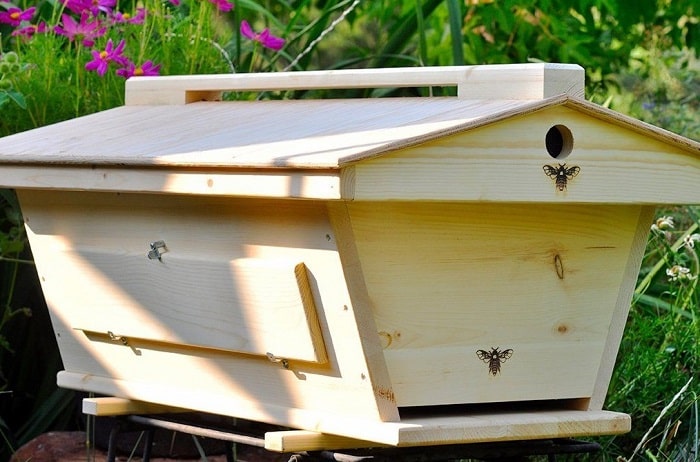
The top bar hive is one of the world’s oldest and most popular hive styles. Historians have uncovered early top bar hive designs dating back to ancient Greece, which comprised of poles set across the tops of baskets or pots. Individual bars are similarly laid across the hive chamber in modern top bar hives, allowing bees to organically create comb without the use of 4-sided frames.
Because of their organic character, top bar hives aid bees. The horizontal top bars with no foundation allow the bees to form their own natural comb, just as they would in the wild.
Beekeepers gain as well. They are not required to move large boxes, apply chemical-laden foundations, or stimulate the bees excessively during colony management. Top bar hives can also save money on beekeeping because they don’t require honey supers, extra frames, extractors, or other costly tools.
How to start a top bar beehive?
Materials
You should use strong materials such as cypress, cedar, or plywood for your hive.
- 2 14½-by-12-by-1-inch pieces of lumber (for the hive end pieces)
- 1/2-inch hardware cloth
- 1 10-by-41-by-1-inch piece of lumber (for the hive base)
- 2 12-by-41-by-1-inch pieces of lumber (for the hive sides)
- 28 19-by-1⅜-by-1-inch furring strips (for top bars)
- 1 9-by-43-inch piece of lumber (for the lid)
- 1 box of wood screws (You’ll need between 15 and 25, depending on how close together you choose to use them.)
- EExterior grade glue
- Sheet of galvanized metal (for the lid)
- 28 strips of 16-by-3/4-inch plastic bee foundation, i.e., Plasticell
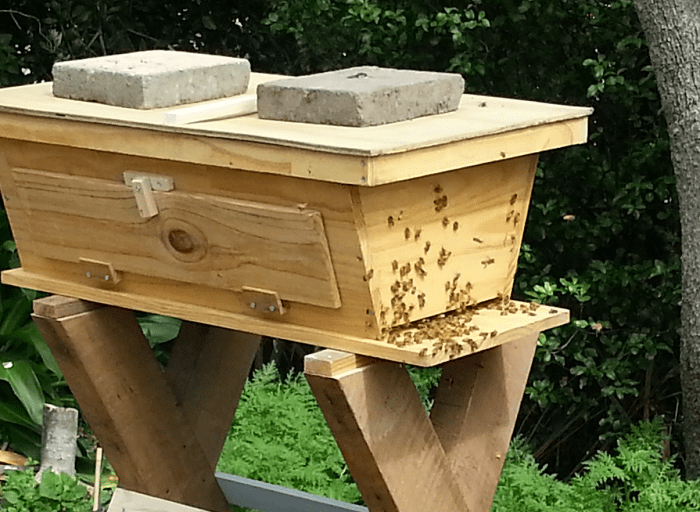
- Cinder blocks (Use the number you need to raise your hive to a comfortable level. We used three on each side for this project, making six total.)
Tools
- framing square
- circular saw or table saw
- drill
- 1-inch hole saw
- wire clippers
- staple gun
- utility knife
Step by step
-
Step 1: Cut hive end pieces
Take one of the hive’s ends. Make a mark 2¼ inches from each end on one 14½-inch side. Draw a straight line from the other 14½-inch side’s left corner to the left-side mark; then draw another straight line from the right corner to the right-side mark. Cut along the two lines with a circular or table saw, leaving a 10-inch length on one side of the end piece that will join to the hive’s base. Rep with the opposite end piece.
-
Step 2: Attach ends
To fit the slant of the side pieces, you will need to bevel the bottom piece. Align one end piece with one 10-inch end of the base piece, flush with the edge. Use a thin drill bit to pre-drill your wood screw holes, then secure them with exterior-grade glue and wood screws. For a proper fit, use a screw every 3 to 4 inches along the connecting edges. It helps to have another set of hands to hold the components securely in place as you glue and screw them in place. Repeat with the other end.

-
Step 3: Drill bee entrances
Cut two circular holes in one of the end pieces using the 1-inch hole saw and drill. This will be the front of your hive. The centers of the holes should be 2 inches from the bottom and 3 inches on each side. To keep rats out, cut two 1 1/2-inch pieces of hardware cloth and staple them to the inside of the end piece.
-
Step 4: Attach sides
Attach side parts to the hive one at a time. Using the same method as for the end pieces, putting glue first and then wood screws every few inches.
-
Step 5: Cut grooves on bars
Using a table saw or router, carve a 1/4-inch-deep groove down the center length of each top bar.
-
Step 6: Attach foundation
Insert a strip of bee foundation into each top bar groove. Fasten the foundation into the grooves using wood glue (or melted beeswax for a safe option). The bees will construct their comb on this foundation, which will dangle down into the hive’s body.
-
Step 7: Place top bars
Place the top bars snugly between the end pieces, the foundation facing down. The top bars are purposefully left lengthy to provide you with extra power when examining combs and harvesting honey.
-
Step 8: Mount hive
Stack the cinder blocks in two columns where you want your hive to be. They will act as your hive’s legs, lifting them to a suitable height for you to reach while keeping the untreated hive bottom off the ground. Place the hive on the cinder blocks, adjusting the placements as needed to ensure the hive is securely in place.
-
Step 9: Place lid
To create your hive lid, secure the metal sheet to the wood top and place it on top of the hive to protect it from the outdoors.
>>> Read more: How High Should A Beehive Be Off The Ground?
How do I manage a top bar beehive?
The fact that top bar hives cannot be enlarged by stacking more boxes distinguishes them from Langstroth or Warre hives. Instead, beekeepers must constantly watch the bars on which bees construct combs, ensuring that the hive does not become overcrowded, inserting new bars to make space, and harvesting honey as needed.
Move the dividing board down the hive cavity and add empty bars as your colony grows. After your final honey harvest, you should reduce the size of the hive cavity so that the bees have less space to heat throughout the winter months. In a top bar hive, bees tend to adhere their comb to the inner hive cavity walls. This necessitates an additional step: removing the comb from the hive before plucking the bars out.
While keeping a hive bar-by-bar requires slightly more time and attention than other hive layouts, beekeepers frequently prefer them because the bees are more docile. Individual bars enable beekeepers to readily check specific portions of the hive and manage the amount of light and air exposure.
Related question
Q. What am I supposed to do in the winter?
As winter approaches, make sure your hive has sufficient honey stores (about 30-50 lbs here in Portland, Oregon). During winter, a small population of bees ball up at the center of the hive, moving through as a group and eating honey and pollen stores.
In the winter or when the temperature falls below 45 degrees Fahrenheit, do not open your hive. When the temperature rises over 45 degrees, your bees will begin to make cleansing flights, and the queen will begin to build the population.
Q. What should I do throughout the spring and summer months?
Is the temperature above 50 degrees? Check your hive every week and a half throughout the peak beekeeping season in early to mid summer to see if you need to make more space or harvest honey. Keep these examinations brief; every time a beekeeper opens a hive, the colony’s productivity comes to a halt.
Q. How do I harvest honey?
Honey harvesting in a top bar hive is simple and requires minimal instruments. Simply remove the top bars of the comb, smash it, and strain it. We do not recommend collecting honey during the first season. Leave it all to the bees and hope for a surplus the next season!
Related Posts:
