Modern beekeeping is synonymous with Langstroth beehives. Beekeeping with Langstroth beehives produces high honey yields and simplifies beehive maintenance. Beekeepers who use Langstroth beehives have the option of purchasing a hive and possibly assembling it themselves, or they can build one.
This article explains how to construct a Langstroth beehive and discusses the key features that make this beehive design style so popular in beekeeping. It also discusses the advantages of using a Langstroth beehive in beekeeping.
Concerning Langstroth beehive frames
Langstroth beehive frames are now made of two materials: wood and plastic. Plastic Langstroth beehive frames are best purchased by a commercial supplier. They are difficult to construct with locally available materials. Wooden beehive frames are simple to make for beekeepers with some DIY skills.
Bees adore wooden beehive components and parts. They accept wood more readily than plastic. Wooden beehive frames can be used without a foundation. This is in contrast to plastic frames that come with a plastic foundation. If you want a foundation on your Langstroth beehive frames, you must install it yourself. It may take some practice to become an expert at foundation installation. So be patient and prepared to make a few mistakes along the way.
Types of wood you can use
Langstroth beehives are constructed from a variety of woods. You can make beehive frames out of pine wood, cedar wood, spruce wood, fir wood, or cypress wood. When building beehive frames, use cedar wood for the best results. If you don’t have any cedar wood, any of the other available wood types will suffice.
The type of wood you can easily obtain is frequently determined by your location. You should also consider the cost implications of purchasing different types of wood and choose the one that fits your budget.
The Uses of Langstroth beehive frames
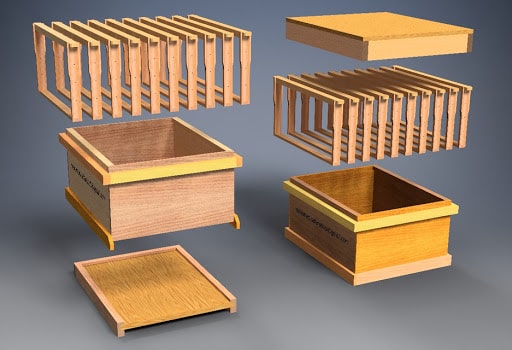
Beehive frames are an important part of a Langstroth beehive. Honey bees build honeycombs on them to raise brood and store honey. By embedding wires in the frames, they are able to hold honeycomb. Wiring makes them less prone to damage during honey extraction. The frames used in the parent box do not need to be wired as they are not extracted.
Standard langstroth beehive frame dimensions
You should follow certain metrics when making Langstroth honeycomb frames, including: deep frames, medium frames and shallow frames. Each frame has the appropriate depth. The deep box and frame are used to accommodate both mom and dad. Meanwhile, the other two types of meetings are used to preserve honey.
- Beehive frames leave a 10 mm gap between the bottom of the beehive and the sides. Bees use this space to access the frames and move up into the next beehive box.
All Langstroth beehive frames are the same width of 35 mm and a length of 480 mm. The frames you create can be used in both 8-frame and 10-frame Langstroth beehive configurations.
- Deep beehive boxes: the frames measure 35 mm wide, 480 mm long and are 230 mm deep.
- Medium beehive boxes: have a width of 35 mm and a length of 480 mm. Their depth is 160 mm.
- Shallow beehive boxes: 35 mm wide, 480 mm long and 134 mm deep.
Read more:
Making Langstroth beehive frames
Equipment and materials needed:
- Lumber
- Hand or power driven sawing tool
- Hammer
- Wood glue
- Dremel, Router
- Sand paper
- Square
- Yard stick calibrated inches, if possible cm too.
Step 1 – Preparations
Prepare your work area thoroughly before you begin. Collect all the materials and equipment you will need and arrange them so that they’re all within easy reach.
Cut and saws are used in the process of making beehive frames. To measure the length of wood by using a yardstick or measuring equipment. Wood with a width of 3.5 mm can be used on all sides of the frames.
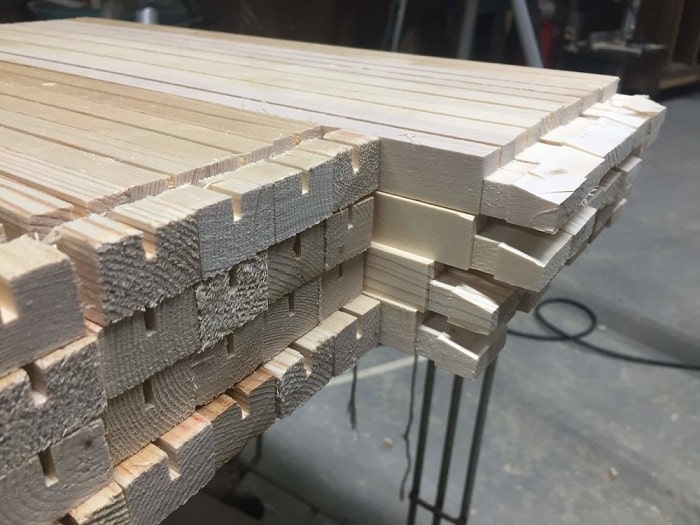
Step 2 – Cutting the wood
Using a saw, cut the wood into the appropriate size. You can group the wood pieces so that they are easy to identify during frame assembly. It is best to create frames with a single depth at a time. Making frames of different depths at the same time can result in wood waste if you make a mistake, such as putting a medium depth sidebar where another sidebar is deep.
The frames’ depth is provided by Langstroth beehive sidebars. The bottom bars help you determine the bottom length of the honeycomb. The length of all kinds of honeycomb frames should be 470 mm. The top bars of the frames are 480 mm in length. The sidebars for Langstroth beehive frames measure 230 mm for deep beehive frames, 160 mm for medium depth beehive frames and 134 mm for shallow beehive frames.
Wood glue and nails or screws are used to join the various beehive frames. When making the frames, you may add holes to the sidebars for use when wiring.
Step 3 – Adding grooves
Make grooves in the top and bottom bars to hold the foundation if you use it in your beekeeping. If you are not going to use the frames’ foundation, you can leave the wood without a groove. However, you should cut a line into the wood to assist bees in getting a better grip on the frames when they begin to make a comb.
Step 4 – Adding notches
Prepare notches on the sidebars of your beehive frame to hold the top and bottom bars. These notches should be the same depth as the thickness of the wood you’re using. They strengthen the frame and ensure that the exact sizes of the beehive frames are maintained.
Furthermore, the sidebars of the Langstroth beehive frame taper down. Make sure to get these tapers in early so you do not have to work on the sidebars after assembly.
Step 5 – Gluing the pieces together
- For one beehive frame, apply glue to the upper groove of the sidebar. This is the groove on the thicker section of the sidebar.
- Fit one top bar into the sidebar groove where you applied wood glue. Make sure to firmly push the top bar into the groove. When fitting the top bar into the sidebar, the wedge cleat groove on the top bar should be on the inside.
- Glue the top bar and the second sidebar together just as you did the first sidebar.
- Turn the partially assembled three-sided frame upside down and apply glue to the grooves on the bottom side. This is the sidebar’s narrowest section.
- Fit one bottom bar into the grooves on your two bars. The bottom bar’s groove should be on the inside. Check that the bottom bar fits snugly into the sidebar grooves.
- Wipe away any excess glue that has leaked out of the joints on your partially assembled beehive frame with a paper towel or clean waste cloth.
Step 6 – Nailing the frame together
- You should not wait for the glue to dry before nailing all the frame’s wooden pieces together. For the best joint strength, a single beehive frame requires at least ten nails. Drive four nails below, four nails above, and one nail to each side of the honeycomb frame.
- Hammer a single nail through the bottom board and into the respective side bars at each bottom end of your frame. After nailing in each nail, check to see if the frame joints are square. If the frame is not square, gently muscle the joints into position until they are.
- Hammer an additional nail into each of the frame’s bottom bar ends. The total number of nails hammered into the bottom bars now stands at four.
- Turn over the partially nailed frame and hammer a nail into each end of the top bars. The nails should be inserted through the top bar and into the corresponding sidebar.
- Examine the top joints for square 900 angles and gently muscle them into place if necessary. Hammer an additional nail into each end of the top bar if the joints are square.
- Hammer a nail near the top of your sidebar. This is repeated on both sidebars. The nail makes your beehive frame last longer by preventing the side and top bars from separating.
Foundation and types of foundation
In beekeeping, people often use a platform to guide bees to the comb. It keeps the comb in place. Using foundation also helps speed up the process of painting the bees’ combs.
Langstroth beehives use two types of foundation: plastic and wax. The plastic foundation outperforms the wax foundation. It has a long lifespan and does not require embedding into frame wires. Bees, on the other hand, do not readily accept the foundation. For bees to draw a comb on a plastic foundation, it must be wax-coated.
You can dip wax base into the wire frame for extra strength and keep it straight. On a wax foundation, bees easily draw combs. It does not separate from the foundation in very cold weather, as plastic foundation does.
The ability of the wax foundation to introduce diseases, pests, and parasites into the beehive is one of its drawbacks. Make sure to purchase wax foundations from reputable suppliers to avoid endangering your honey bees.
Cleaning and reusing frames
It is necessary to clean beehive frames on a regular basis. You should remove the old wax from the frame to prevent chemicals and disease-causing spores from accumulating in the hive.
Using water and clorox to clean the beehive frames in your Langstroth beehive. Boiling the frame will help you scrape off the propolis. You can reuse the nests when they dry. You can clean the bee frame at any time of the year. However, cleaning frames is easier in the winter. Beekeepers enjoy doing this activity in the mornings when the bees are not flying.
Cleaning frames can begin in the apiary or in a specific location such as your backyard or garden shed. Cleaning frames frequently necessitates the use of heat and chemicals. This aids in the removal of wax from the frames. It also kills pests, parasites, and microorganisms at various stages of development in the frame.
Benefits of making Langstroth beehive frames
- You can be confident in the quality of the frames because you made them yourself. The frames will last for a long time, and you will enjoy working with them.
- Making your own frames is frequently less expensive than purchasing frames from beekeeping equipment manufacturers. Even if you purchase frames, you may need to assemble the pieces yourself.
Conclusion
Using the right type of wood, high-quality materials, appropriate tools, and precise measurements will ensure a strong, long-lasting, and high-quality hive. When constructing a new home for your honeybee colony, follow this guide on how to build a Langstroth beehive. The guide is also useful when creating a replacement part for worn out or damaged parts.
Related Post
