Langstroth’s beehives are made of stacked boxes. By utilizing the available vertical space, this feature provides the Langstroth hive with exceptional scalability. Langstroth honeycombs come in two sizes: 10 frames and 8 frames. This article explains how to built a Langstroth beehive box.
Considerations for constructing a Langstroth beehive box
There are general points to consider when building a honeycomb box.
A bottom board is present in a Langstroth beehive. This is the beehive’s lower cover. The upper seal or surface of the beehive is provided by the top cover and inside cover. A Langstroth beehive is one enormous continuous space between these two coverings, broken only by beehive frames. This means that a beehive box lacks a top and bottom surface. Making a beehive box consists solely of constructing the box’s sides.
Beehive frames are placed on the top of the beehive box. You need to groove in this upper part to allow the frames to fit correctly while providing a more continuous outer surface for the Langstroth honeycomb stack. The frame in the honeycomb box does not extend to the edge of the box.
Beehive materials
- Wood: The ideal material for creating Langstroth beehive boxes is wood. Other typical wood species used in the construction of Langstroth beehive boxes are pine, cedar, and cypress. Other forms of wood, including plywood, cardboard, block-boards, and fiberboard, are unsuitable for use in building a beehive box.
- Nails: Nails will be required to link the components of the beehive box together. They are more appropriate for the task than wood staples. However, power tools can be used to construct a beehive box. A little wood glue would also be helpful in strengthening the seams.
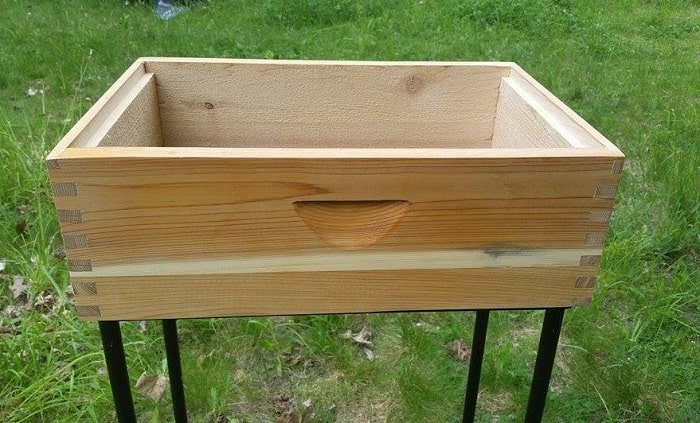
- Box joints: All Langstroth beehive boxes employ box joints (also known as finger joints). They offer the boxes great strength and assure the box’s durability.
- Power tools: Beehive boxes can be built with power tools. They assist you in completing the task more quickly. Saws and drills can also be used to drive screws. These are common power tools in the construction of a honeycomb box.
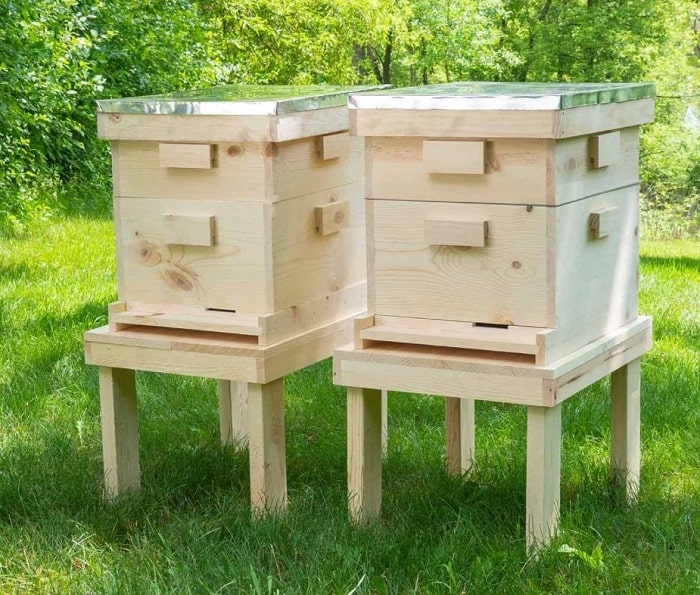
Langstroth 10-Frame beehive box
The 10-frame honeycombs include medium, deep or shallow boxes. When beekeepers know how to make all sizes of 10-frame hive boxes, they will be better prepared to reap the benefits of their hive.
- Shallow beehive boxes are useful as honey supers. When they are full of honey, they are not too heavy to lift off the beehive.
- A beehive medium sized box is a preferred choice of box for many beekeepers. It can be used for brooding and for honey storage.
- Deep boxes are great for thing rearing a brood. They require little lifting and moving. This makes them easy to work with in a Langstroth beehive even when they get heavy with brood.
Langstroth 8-Frame beehive box
Eight-frame Langstroth beehives are smaller than 10-frame beehives. They do offer advantages over 10-frames, particularly in terms of ease of working with the beehive and wintering honey bees.
There are three types of beehive boxes in this classification: deep, medium, and shallow. Beekeepers that have an 8-frame Langstroth beehive configuration in their apiary will find usage for all three boxes at the same time. As a result, knowing the size of all the boxes is essential when you need to build one.
How to build a Langstroth brood box
In Langstroth beehives, a brood box is often a deep box. The edges of this Langstroth beehive box are the deepest of any Langstroth beehive box. The depth of the deep brood box is 9 and 5/8 inches.
-
Step 1: Organize your work area
Make a checklist of all the parts you will need to prepare before making many boxes. Then you can arrange them in an organized fashion, with all the box parts together. When you have all the parts for all the boxes you need, you can begin the matching process.
-
Step 2: Collect materials and equipment
For power tools, make sure they are ready and all bits are available.
Lumber, hardware, and fasteners are the three major kinds of materials and equipment required. Tools, paint, preservatives, and wood glue are among the hardware items. Nails, screws, and corner strengtheners are examples of fasteners. Fasteners of 12 inch lath screws, 2 inch galvanized nails, and 1 and 3/8 inch deck screws are appropriate for most types of lumber.
-
Step 3: Preparing the wood
Before you begin creating a deep hive box, plan the wood ahead of time. As much as possible, avoid knots in the woods. Tie knots in the center of the pieces, rather than at the edges, if possible. If the notches are too close to the edge of the piece, the nail can split the wood. Making grooves and nicks in wood can also leave chunks of wood useless.

Read more:
-
Step 4: Cut the wooden plank
If you’re using a 6-inch-wide board, you’ll need to cut many pieces into 3 and 5/8-inch sections to achieve the usual depth. Over the four sides, alternate the fewer wide planks between the top and bottom of the box.
In one profile, this will have sections that are less wide at the top along the length of the box and at the bottom along the width. In another layout, they can be at the bottom along the length and at the top along the width.
The box will require four pieces of wood. Two pieces put together will make the length of the box. Similarly, the other two pieces will create the width. When components overlap, some length is added. For a deep honeycomb box, you should reinforce the thickness of the wood pieces in both length and width. Using 1 inch thick wood, add 1 inch to each end of your piece of wood.
8-Frame
When working with a 1-inch thick material, cut two slabs of wood to a length of 19 and 3/8 inches for an 8-frame beehive box. The planks for the breadth should be trimmed to 13 ¼ inches with the same consistently thick material. These wood specifications allow for a box junction in all four corners of the box.
10-Frame
When constructing a 10-frame beehive box, trim the wooden planks to 19 and 3/8 inches in length. This is when you have planks that are 1 inch thick. The width of the planks should be cut to 15 ¾ inches. When cut, the length of both 8-frame and 10-frame boards is similar. This is due to the fact that they construct the beehive box’s static sides.
-
Step 5: Grooving and notching
First, select how you want your cut boards arranged so you know which plank is on top. Cut a groove across the width of the wood to create the honeycomb structure for the seat.
The notch should be 3/8 inches wide and 5/8 inches deep. Work your hands on the grooves that link the grill box to the ends of the hardwood planks once you’ve cut them. Each track should be 1 inch long and 1 inch wide. The next groove should be 1 inch away.
-
Step 6: Join the width and length planks
Insert a length and a breadth board into your box. For improved bearing, wood glue and filler might be employed. Check the joint for correct angles and make any necessary changes. Nail the glued-together joints and double-check the angle again.
-
Step 7: Attach the pieces together
You can use 2-inch nails to join the pieces. Besides, you can also use screws to combine or replace them. Nails or screws that pass through the box junction must not be cut from separate pieces of wood. For added robustness, some beekeepers drive 2-3 nails diagonally into each corner of the box.
-
Step 8: Add a second length piece
Add wooden pieces to make the honeycomb box’s second length. You should check the accuracy of the wood joints and possibly use glue or filler as needed. Check for correct angles by driving a few nails into the fresh additional pieces of wood. Adjust as needed until the joints are at the right angle.
-
Step 9: Add Second Width Piece
Adding the final pieces of wood completes the deep honeycomb box’s second width. Use wood glue and filler to reinforce the joints once more. After installing each wood panel, inspect the corner joint for proper angles. Don’t hurry towards nailing the joint and the entire box until you’re certain you’ve got all the corners at the proper angle. A box with no straight angles will not fit into the Langstroth hive stack with the other boxes.
-
Step 10: Finishing touches
Nail the box once you are certain that all joints and corners have proper angles. If you are going to utilize metal pieces to reinforce the joints, do it now.
You should wait for the wood glue to dry before using it. The box corners will no longer be perpendicular if you move the box or place heavy objects on them when the wood glue has not completely dried.
Conclusion
You can use wood preservatives and paints when crafting beehive boxes. You can apply the preservative before or after assembling the box. Make sure to use wood preservatives and paints that do not agitate or repel honey bees. Allow ample time for the preservative and paint to dry before putting the beehive box to use.
Langstroth beehive boxes are not expensive to purchase, but they are even less expensive to install yourself. To manufacture your own apiary boxes, follow these step-by-step instructions on how to build a Langstroth beehive box.
>>> Related Post: Best Honey Extractors Review 2021
